
Before reading the information on this help page, be sure to have read the general information for all content creators/editors.
Events appear on the What's on page. An event displayed on that page looks similar to this:
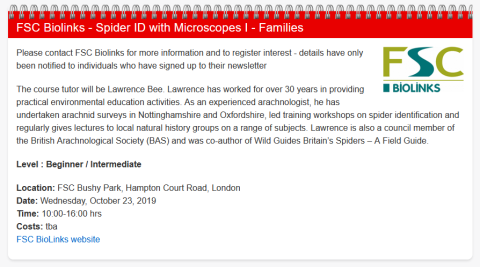
In the event create/edit form enter the name of the event in the title field. In the example show below this is: FSC Biolinks - Spider ID with Microscopes I - Families.
Tick one (or more) of the event type boxes. These terms can be used by users of the What's on page to filter the events they can see. In the example shown, the box next to Course will have been ticked.
In the location field, indicate where the event is to be held. Be precise but concise. If more detailed location instructions are needed, save them for the general description field (see below).
Indicate the date of the event in start date field. This is a mandatory field. If you do not know the date of the event at the time you are creating the event item, set it to the January 1st and add a clear note to the general description field (see below) to say that the date of the event is unknown at this point.
If the event spans more than one day, enter the final date in the end date field.
If you know the start and/or end times for the event, enter them in the times field. This is a free-text field, so you can type what you like. But to be consistent with other events and to avoid ambiguity, it is recommeded that you use a 24 hour formal like that show in the example.
If there is a fee for the event, enter details in the costs field.
If you have contact details for the event, e.g. an email address, you can enter it in the contact field, but don't put in anything that you don't have permission to share.
The description field is for you to enter a description of the event. In contrast to other fields, this has an editor that allows you to format text. It is very much like the body field described in the general help page - so check there for information on how to use it. Note that you should not generally need to insert images in this part - for this content type there is a separate field - image - for adding an image (see below).
You can use the image field to upload an image, typically a logo, which will be displayed as a small image on the right of the event. Just click the browse button and find the image you want to upload.
Use the web control field to enter web addresses to be displayed with the event. Enter the web address in the URL field and the text to be used for the link in the link text field. In the example above, the URL field was set to https://www.fscbiodiversity.uk/subscribe-our-fsc-biolinks-newsletter and the link text to FSC BioLinks website. So when the user clicked on the FSC BioLinks website link, they are taken to the web page specified by the URL.
You can associate as many links as you like with the event item. Another common use might be to add links to directions, a map or accomodation.